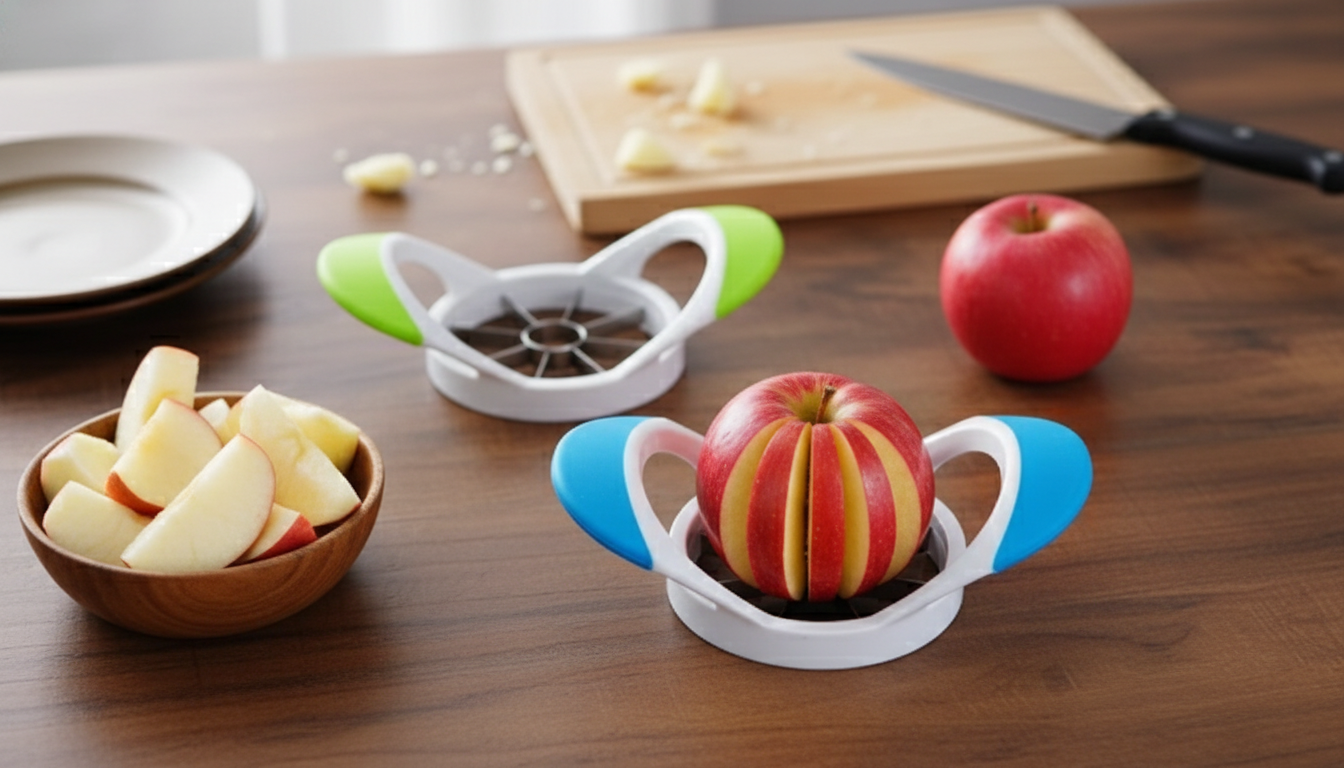
Stainless Steel 8‑Blade Apple Slicer and Corer with Non‑Slip Handle
Fast, even apple wedges make snacks, baking prep, and lunch packing simpler. A stainless steel 8‑blade apple slicer and corer turns one whole apple into uniform pieces in a single press, and the non‑slip handle helps you keep steady control on the countertop. For busy kitchens, it’s an easy way to move from “whole fruit” to “ready to serve” without extra steps or uneven cuts.
What It Does (and Why 8 Blades Matter)
An apple slicer/corer is designed to do two jobs at once: remove the core and segment the fruit into consistent wedges. With an 8‑blade layout, the slices land in a practical middle ground—small enough for quick snacking, but substantial enough for recipes that need structure.
- Slices and cores an apple in a single downward press for consistent wedges.
- Eight blades create moderately sized slices that work well for snacking, salads, and pie filling prep.
- Uniform pieces promote more even cooking in baked recipes and more consistent portioning for lunches.
Design and Build Details to Notice
Not all slicers feel the same in the hand. The difference is often in the blade material, how the frame distributes pressure, and whether the handle stays secure when your hands are wet from rinsing fruit.
- Stainless steel blade set supports clean cuts through firm fruit when aligned over the core.
- Integrated coring ring removes the center core while the blades segment the fruit.
- Non‑slip handle improves grip, especially with wet hands or when working quickly during meal prep.
- A stable frame helps distribute pressure across the blades to reduce tipping during the press.
For best results, pair the slicer with a sturdy cutting board that won’t slide around. A damp paper towel under the board can add extra stability on slick counters.
How to Use It for Clean, Even Slices
Getting neat wedges is mostly about alignment and even pressure. A few small habits make the cut cleaner and help reduce stuck wedges.
- Place the apple upright on a cutting board; center the coring ring directly over the stem/core line.
- Press down evenly with both hands on the handle to keep the frame level and the wedges uniform.
- For very large apples, start with a shallow press to “set” the blades, then finish with a firm push.
- If the apple is extra hard or cold from the fridge, allow it to sit at room temperature briefly for smoother cutting.
If a wedge clings to the blade after slicing, lift the slicer straight up and give a gentle, controlled nudge from the underside—keeping hands away from the cutting edges.
Comfort, Control, and Safety in Everyday Prep
When you’re slicing multiple apples for lunches, a party tray, or baking, comfort and control matter as much as sharpness. A non‑slip handle helps maintain steady pressure and can reduce hand strain during repetitive prep.
- Non‑slip handle reduces hand strain and helps maintain steady pressure during repetitive slicing.
- A flat, non‑moving cutting surface lowers the chance of slipping; avoid slicing directly in the hand.
- Keep fingers above the blade plane; lift the slicer straight up after the press to avoid contact with edges.
- For kids’ snack prep, adult operation is recommended; store the slicer out of reach when not in use.
Basic kitchen safety rules still apply: wash produce before cutting and keep prep surfaces clean. For general food-handling guidance, the FDA’s kitchen safety basics are a solid reference: FDA Food Safety: Kitchen Basics for Handling Food Safely.
Cleaning and Care for Stainless Steel Blades
Apple juice and natural sugars can dry quickly between blades, so a quick rinse right after use usually makes cleanup much easier.
- Rinse promptly after use to prevent dried fruit sugars from sticking between blades.
- Use a dish brush to clean between the blade gaps from the underside outward (away from sharp edges).
- Dry thoroughly to maintain a clean finish and help prevent water spots; store in a dry drawer or hang if possible.
- Avoid using abrasive pads that can scratch surfaces; mild dish soap and warm water are typically sufficient.
Where It Shines: Snack Prep, Baking, and Entertaining
Apples are also a nutrient-dense snack choice; for typical nutrient data, the USDA database is a reliable source: USDA FoodData Central (Apples, raw, with skin).
Choosing the Right Blade Count and Handle Style
Quick Comparison: Common Apple Slicer Styles
| Style |
Slice Count |
Best For |
Trade‑Offs |
| Classic 6‑blade slicer/corer |
6 wedges |
Thicker wedges, grilling, hearty snacks |
Less uniform for small portions; bigger bites |
| 8‑blade slicer/corer |
8 wedges |
Everyday snacking, lunch prep, baking prep |
May need extra force on very firm fruit |
| 10–12 blade slicer/corer |
10–12 wedges |
Thinner slices, dehydrating, fruit platters |
More blades can mean more resistance on dense apples |
Product Snapshot
More In‑Stock Picks
FAQ
Will it work on very large apples?
It depends on the apple’s diameter and firmness compared with the slicer’s frame. Center it carefully and press evenly; if the apple is wider than the frame, trimming a thin slice from one side can help it sit and press more cleanly.
Is the stainless steel blade set dishwasher safe?
Check the product’s care guidance first, since dishwasher conditions can vary. Hand washing with mild soap and thorough drying typically helps preserve the finish and reduces residue between blades.
How can sticking be reduced after slicing?
Rinse the slicer right after use and use a brush to clear blade gaps from the underside outward. When lifting off the apple, a straight upward lift (and a slight, controlled twist if needed) can help release wedges cleanly.
Recommended for you


Leave a comment